MetaMask is a popular non-custodial crypto wallet that allows you to access Web3 / blockchain apps on Ethereum.
MetaMask allows you to send and receive tokens like ETH, store NFTs, use dApps, and Swaps tokens.
MetaMask can’t store Bitcoin.
It works with Ethereum and the many compatible tokens including ERC-20, ERC271, NFTs and Web 3.0.
Since 2016 MetaMask has had a decent although not perfect rating among thousands of reviewers. Designed originally as a browser extension, it released a stand alone app on iOS and Android in 2019.
MetaMask lets you securely trade assets, lend, borrow, play games, publish content, buy rare digital art, and more.
You can create and manage your own identities (via private keys, local client wallet and hardware wallets), so when a dApp wants to perform a transaction and write to the blockchain, you’ll get a secure interface to review the transaction, before approving or rejecting it
When you first create your MetaMask wallet, especially on mobile, it offers you a lot of options. It can be confusing and daunting to get set up. This guide is here to walk you thorough it.
Key Takeaways
MetaMask is our most recommended Ethereum wallet.
MetaMask is available as a mobile app and/or a browser extension.
MetaMask supports hundreds of different tokens.
The mobile app has a browser which automatically shows multiple DApps that you can explore and use.
It’s security and ease-of-use are excellent.
Guy from Coin Bureau breaks it down here:
Setting Up Your MetaMask Wallet
1.
Download MetaMask
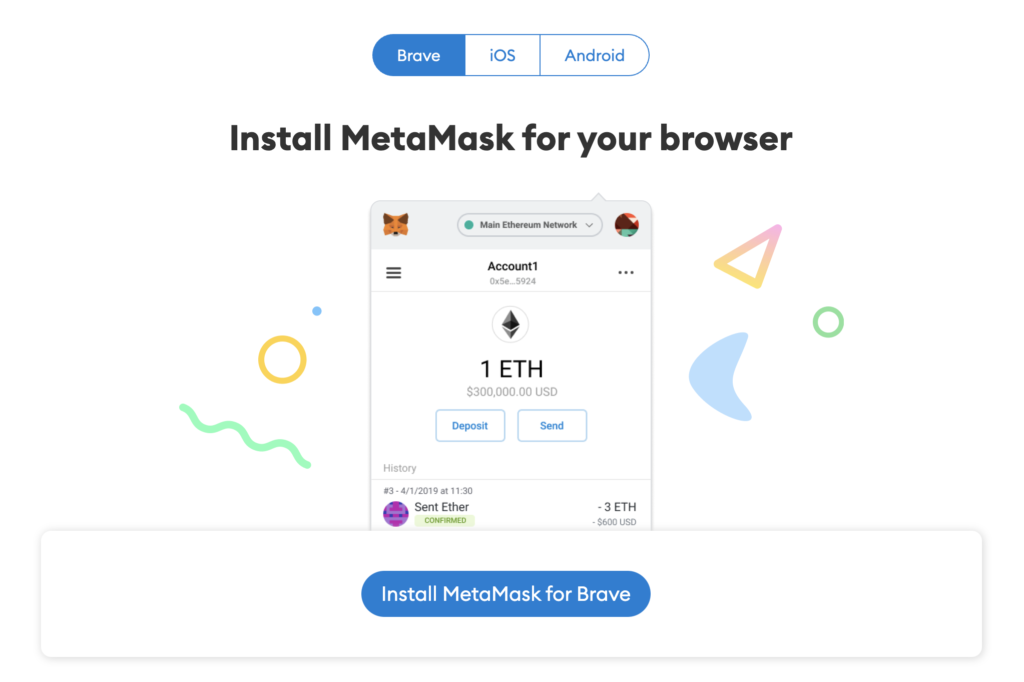
Use the official site (metamask.io) to download and install MetaMask.The extension is available for Chrome, Firefox, Brave, Opera, Edge, and Brave browsers.
Metamask is also an app on iOS and Google Play.
Always make sure you are using the official links.
The app comes with a built-in privacy browser, with links to different apps and exchanges. The browser extension allows you to connect to your hardware wallet which can make using the extension a little safer than the app.
Make your choice and click the big blue Install button.
2.
Set up a Secure Password
We recommend using a Password Manager such as 1Password to auto generate a secure password. It will also make sure that your passwords are hard to crack and not present in any existing password leaks online.
Your password will unlock the app so you can use it.
This is not the same thing as a Recovery or Seed Phrase that you’ll need to set up next.
Make this easy on yourself by using a Password Manager like One Password or LastPass. We’ve reviewed and compared our top three Password Managers here. Any one of these that you choose will be much better than not using one at all and they are all pretty good.
You may want do this first.
Read, Agree and click the Create button.
3.
Set up your New Wallet with a Recovery (Seed) Phrase
A recovery phrase ensures that if anything goes wrong, your phone breaks, gets dropped in the lake, or the app gets deleted, it doesn’t matter — you can always restore your wallet with this phrase.
We’ll see that pop up in a few more steps.
Make sure you store that phrase in a safe place. Don’t copy and paste this. Don’t store it digitally or back it up to the cloud.
Keep it offline.

Next, MetaMask will show you a video about your recovery phrase.
It’s literally the key to your wallet and funds. Enter it in a password manager, a bank vault, a safe deposit box, or somewhere else secure. Never, ever, ever share it with anyone else. If someone else, even your brother, asks you for this seed phrase, they are trying to steal funds from your wallet.
Continue once you’ve watched that video.
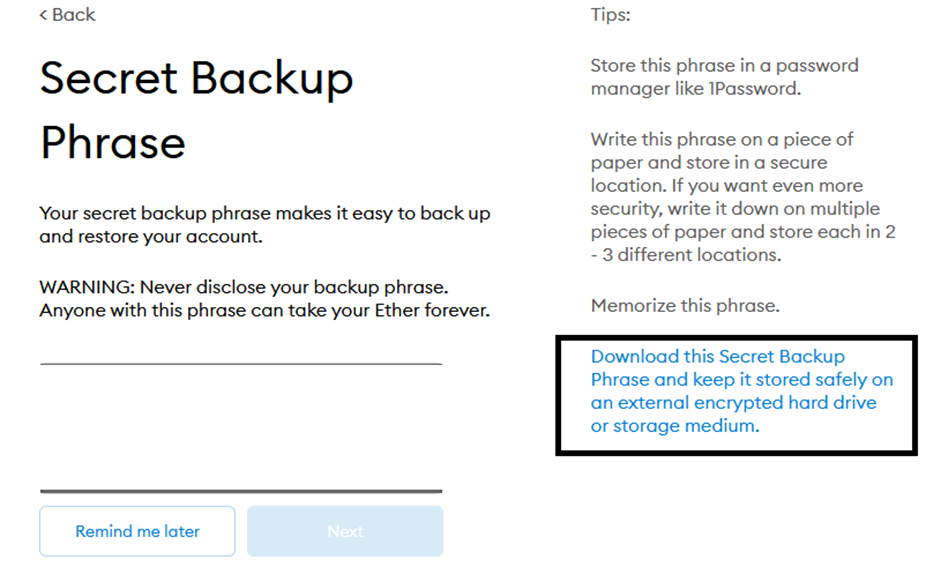
The lock icon reveals your secret phrase (words).
You need to write them down in the correct order, otherwise they won’t work. You can also download the secret backup phrase.
Once you’ve got it secured, click Next.
You’ll be asked to put the phrase back in order by dragging and dropping the words. Once this is verified, you can click Next to continue.
You get to a screen congratulating you on a job well done. It is time to learn about all the features of your wallet.
Click: All Done
3.
Exploring Your MetaMask Wallet
When you open your wallet, the only cryptocurrency listed will be Ethereum (ETH).
By default, it will only create one initial account.
Note:
MetaMask allows you to separate and create different accounts storing ERC-20 compliant tokens and ERC-721 (NFTs) on the Ethereum blockchain.
You can also connect to other chains like Polygon or Base.
The circular icon on top of “Account 1” in the mobile app, or the top-right-hand corner is “Account 1”. That’s you by default. You can create a second account and switch between them.
If you want to change your settings and the display, that little gear icon at the top right of the browser will take you there. On your phone, click the menu on the top-left corner of the app interface.
These are a few features:
- Currency conversion
Change from USD to another type of currency - Primary currency
Set the values to show either in Fiat or ETH - Security and privacy settings
View or back up your secret recovery phrase or change your password. On mobile, you can set an auto-lock time for the app and allow for sign-in with biometrics.
The Landing Page for Your Wallet
At the very top, you will see the name of the current account (Account 1). Since you are viewing your Ethereum, your Ethereum address is printed below the current account. If you mouse over Account 1, it gives the option to “Copy to clipboard”.
This is your public key – if you want to receive ETH to this public wallet, you’ll need to share this address.
Adding New Tokens
If you plan to swap ETH for another cryptocurrency (like LINK or ZIL), it won’t show up on your app right away.
Before making a trade, click “Swap” and search for the token you want on the following screen. Once you select it, the token icon will show up in your wallet. If you forget to add the token first, don’t worry. When you add the token address to your wallet, your BAT will still show up.
If you can’t find a token…
Sometimes there are more obscure tokens you can’t find through the search feature.
Press the “Custom Token” button.
Now you’re going to need to find the Token Contract Address for this cryptocurrency. This verifies that you are purchasing or trading for a legitimate token. Just think of this as an ID badge for one of these currencies. For this tutorial, let’s say we want to add the AMP (AMP) token.
We can find the Contact Address on etherscan.io. We type AMP into the search and select Tokens from the drop-down list of filters.
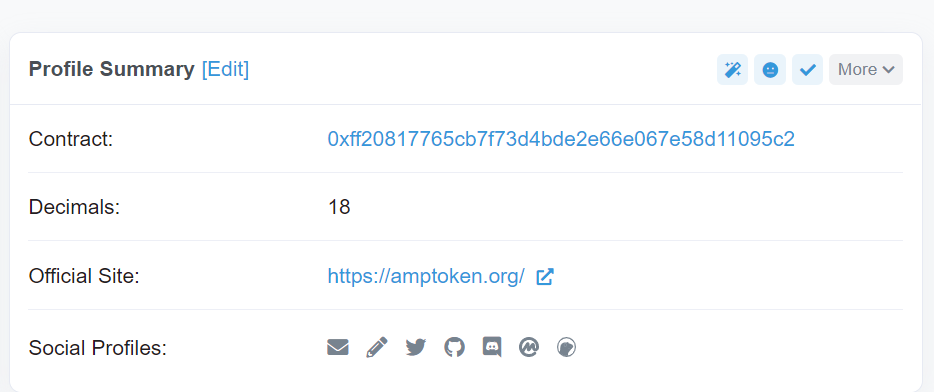
Then it’s just a matter of copying the contact address and pasting it into MetaMask. The rest of the information will be auto-filled.
Click: Next and it’s added to your wallet.
If you have value stored across multiple tokens, the value of your account will change.
Sending and Receiving
It is important to know before you start peer-to-peer transactions, that each token in your wallet has a separate address.
If you send Ethereum to your AMP address, you will lose it forever. Basically, don’t send any Ethereum to a non-Ethereum address (like a Bitcoin address). Make sure you are copying the correct address every single time. Double and triple check every time.
Do a small test transaction.
Click on the currency you want to send or receive. You will have a few buttons below the token and a list of all the transactions involving this particular token. While there is a button that lets you swap or buy crypto, there are better crypto exchanges that we discuss in another article.
Once you click send, you can either import the address of the recipient wallet by scanning a QR code or copy and paste it into their wallet address. Do not write it in manually, that leaves room for error. If you want to receive cryptocurrency, or transfer it from another Metamask account, click on the Receive button, you’ll get a QR address that you can scan or simply copy and paste.
There is also an option to ask a friend for payment. Simply click that button, type in the value in the crypto that your friend owes. You can either copy a link to your clipboard, as a QR code or send the link through your phone on an existing messaging app.
Transaction Fees and Gas
Anytime you make a transaction on the blockchain, there is a fee associated with it. This fee is calculated in Ethereum and it incentivizes miners to validate your transaction. When there’s a lot of traffic on the blockchain, the cost of gas will increase. At peak times, gas might cost more than your entire transaction. Unless you’re willing to spend a lot of money on gas, it might be best to wait until the gas price drops.
Learn more about Gas fees.
If your transaction is moving slowly, the Gas fee might be too low.
Go to your wallet and click on the token in which you are transacting. You will see a list of all your transactions, including the ones that are currently in progress. You can click to Speed Up, which adds more Gas to your transaction.
You can also cancel a transaction. This requires a Gas fee as well.
Exclusive Features on the Mobile App
There are more beneficial features you can access on your phone via MetaMask’s built-in Browser. While you still can’t link up your phone to a hardware wallet, the mobile app makes it easy to explore new apps within the ecosystem. When you click the menu at the top-left corner of your wallet, you can select the Browser.
This is a privacy-focused browser that lets you access decentralized apps on the Ethereum network. This browser provides more privacy than Google Chrome and lists several decentralized Apps (DApps) for you to explore. DApps allow you to buy and exchange tokens, earn interest on your coins and even play games.
When you open a new tab on your app, you can explore the different options and apps.
Here’s a quick overview and definition of some of DApps, tokens and services:
- Decentralized Finance (DeFi): This is a blockchain version of banking, with many apps allowing you to conduct direct peer-to-peer transactions, earn interest and even get microloans.
- Decentralized Exchanges: Here you can search out the best rates for trading Ethereum tokens. These let you swap Ethereum for just about any other token on many different exchanges.
- Arts and Collectibles: Remember smart contracts? Well, there’s another set of algorithmic rules called ERC-721. It’s used to make one-of-a-kind collectibles and art pieces, called non-fungible tokens. This browser links you to different sites where users can create, sell and trade these tokens. Best of all, they are supported by the MetaMask wallet.
MetaMask is a solid Ethereum wallet. It allows even an inexperienced trader many options to play with.
We’ve used it and recommend it.